Some of these tutorials were from HL2 world and other sources.
Please feel welcome to suggest a tutorial!
For now here are the tutorials:
n00b Tutorials:
Create a Buy Zone
Creating Bombtargets
Novice Skill Tutorials:
Creating a Basic Ladder
Creating a Basic Elevator
Creating a Basic Door
Basic Fan
Medium Skill Tutorials
BSPZIP Tutorial
Creating Glass
Advanced Skill Tutorials
Displacment Mapping Tool
Much thanks to:
DudeGPQ
RomeoJGuy
Madball
Vivalapimpd
Juzu89
Unsane
Zpanzer
More to come soon!
HL2 and CS:Source Tutorials
-
vivalapimpd

- Posts: 62
- Joined: Fri Feb 18, 2005 8:12 pm
HL2 and CS:Source Tutorials
Last edited by vivalapimpd on Mon Jun 27, 2005 1:45 pm, edited 17 times in total.
I am 84% addicted to Counterstrike. What about you?
-
vivalapimpd
- Posts: 62
- Joined: Fri Feb 18, 2005 8:12 pm
Creating a Basic Elevator
Creating a Basic Elevator
By Unsane
First you need to create your lift car. For the purpose of this tutorial I created it out of brushes, selected them all and tied it to entity func_tracktrain. Now being a func_tracktrain it will need tracks; so in the map you should end up with something like this if successful:

You can use any ammount of path_tracks you want, but don't use pathcorners, that was for Half-Life 1 and wont work in Half-Life 2. In this case I have created 3. Now before we keep going; let’s establish names on what we have:
* The liftcar is named: elevator
* The path_tracks are named: lvl01, lvl02, lvl03 from the bottom to the top.
* Remember to set next targets too. For lvl01 set target to lvl02, for lvl02 set the targer to lvl03, for lvl03 set target to lvl01.
Liftcars (func_tracktrain) properties are as follows:
* Name: elevator
* Max speed: use what you like, I used 25.
* Initial speed: 0 (so the elevator doesn’t start moving oddly)
* Height above track: I set mine to around 4, the path Entities are aligned with the bottom of the car.

The rest is default; except for the flags: go in here and tick these 2:

* No Pitch (X-rot)
* No User Control
"What, no user control?" you say "but I want buttons?!" And that you will get, but this is actually a train, right, so user control would mean that it was controllable in the same way as the train in 'On A Rail' in HL1. We don’t want that.
Now the paths. The first one at the bottom, give it a name, and a target and set 'New trainspeed' to '0'. The next one, name, target and set this output:

Do the same for the last one too.
And here comes the buttons:
Make a func_brush w/ a button texture inside the car and parent it to the elevator. Alternatively; you could just make it part of the func_tracktrain, as this is not really a button but just a brush to show where the button is.
* Note: I did it this way for two reasons; first because in this case I created the car before even thinking about buttons (this is my first elevator), and secondly I can move the button if I want to. In the example map the buttons are on the wall on each floor, but it looks better with them inside the car.
Now, over the func_brush make a nodrawed brush and tie to entity func_button. Place one of these on each floor, where your func_brush button will be. Name them. Go into the first: Flag them:
* Dont Move
* Use Activates
Do that for all of them
In the first, set the output:

In the next, set the output:

In the last, set the output:

That’s it! Now you have a very basic elevator that moves when you press the button and stops on each floor.
By Unsane
First you need to create your lift car. For the purpose of this tutorial I created it out of brushes, selected them all and tied it to entity func_tracktrain. Now being a func_tracktrain it will need tracks; so in the map you should end up with something like this if successful:
You can use any ammount of path_tracks you want, but don't use pathcorners, that was for Half-Life 1 and wont work in Half-Life 2. In this case I have created 3. Now before we keep going; let’s establish names on what we have:
* The liftcar is named: elevator
* The path_tracks are named: lvl01, lvl02, lvl03 from the bottom to the top.
* Remember to set next targets too. For lvl01 set target to lvl02, for lvl02 set the targer to lvl03, for lvl03 set target to lvl01.
Liftcars (func_tracktrain) properties are as follows:
* Name: elevator
* Max speed: use what you like, I used 25.
* Initial speed: 0 (so the elevator doesn’t start moving oddly)
* Height above track: I set mine to around 4, the path Entities are aligned with the bottom of the car.
The rest is default; except for the flags: go in here and tick these 2:
* No Pitch (X-rot)
* No User Control
"What, no user control?" you say "but I want buttons?!" And that you will get, but this is actually a train, right, so user control would mean that it was controllable in the same way as the train in 'On A Rail' in HL1. We don’t want that.
Now the paths. The first one at the bottom, give it a name, and a target and set 'New trainspeed' to '0'. The next one, name, target and set this output:
Do the same for the last one too.
And here comes the buttons:
Make a func_brush w/ a button texture inside the car and parent it to the elevator. Alternatively; you could just make it part of the func_tracktrain, as this is not really a button but just a brush to show where the button is.
* Note: I did it this way for two reasons; first because in this case I created the car before even thinking about buttons (this is my first elevator), and secondly I can move the button if I want to. In the example map the buttons are on the wall on each floor, but it looks better with them inside the car.
Now, over the func_brush make a nodrawed brush and tie to entity func_button. Place one of these on each floor, where your func_brush button will be. Name them. Go into the first: Flag them:
* Dont Move
* Use Activates
Do that for all of them
In the first, set the output:
In the next, set the output:
In the last, set the output:
That’s it! Now you have a very basic elevator that moves when you press the button and stops on each floor.
Last edited by vivalapimpd on Thu Jun 23, 2005 2:36 am, edited 1 time in total.
I am 84% addicted to Counterstrike. What about you?
-
pcgamer58

- Posts: 3373
- Joined: Sun Dec 21, 2003 7:46 pm
- Location: Seizure room in nippers100
- Contact:
Edit: Nvm
Good job on getting these tutorials posted here, some of the images on the Wiki dont work
Good job on getting these tutorials posted here, some of the images on the Wiki dont work
Last edited by pcgamer58 on Thu Jun 23, 2005 2:39 am, edited 2 times in total.

Last.fm Recent Tracks

-
vivalapimpd
- Posts: 62
- Joined: Fri Feb 18, 2005 8:12 pm
Creating a Basic Ladder
Creating a Basic Ladder
By Juzu89
Create a prop_static entity. In its properties goto world model, select metalladder001.mdl from your models/props_c17 folder.
Now, using the Block Tool, make a brush that is as wide and high as your ladder. Browse for the texture invisible. Right click, press Create Object, and tie it to entity using Ctrl+t. Tie it to the entity func_ladder and click apply. Go ahead and test your ladder and it should work.
Last edited by vivalapimpd on Thu Jun 23, 2005 2:35 am, edited 2 times in total.
I am 84% addicted to Counterstrike. What about you?
-
MrBlip

- It was inevitable.
- Posts: 6918
- Joined: Fri Jan 28, 2005 9:55 pm
- Location: Narshe
-
vivalapimpd
- Posts: 62
- Joined: Fri Feb 18, 2005 8:12 pm
BSPZIP Tutorial
BSPZIP Tutorial
By Vivalapimpd
Ok, well for all those people out there who want their maps to have all their textures embedded (to include) into their BSP file instead of making a RES then this is surely the place for you. First off you will need to make sure you know your steam username, if you dont you are retarded :?. Next you need to make a text file with a list of materials that you want to be embedded, the format of the file is like this:
So for example if you wanted to include a texture here is an example:
Remember that you replace [username] with your username. Also remeber to include that extra line at the end! It is very important. That will include the texture C:\Program Files\Steam\SteamApps\[username]\counter-strike source\cstrike\materials\customtexture\test.vtf
Next save it on your computer to a text file. I'll save mine to C:\include.txt
Next go to Start>Run, in the prompt type 'cmd' without the quotes, click ok. Command prompt will open, now type in the following, remember, it is going to go to the Valve/Steam/SteamApps/[username]/sourcesdk/bin folder so your may vary. By default you should type in to following into command prompt:
Again, remember to change [username] to your username. Next you need to embed the materials in, use this code:
Replace the parameters, here is an example, keep in mind I am going to put my username in, it is vivalapimpd.
Your done, go ahead and test! ") Keep in mind you can include as many textures or models or sounds into the text file, just keep following the format, keep it in one text file. Happy Mapping!
Keep in mind you can include as many textures or models or sounds into the text file, just keep following the format, keep it in one text file. Happy Mapping!
NOTE: Always put a blank line at the end or you text file!
By Vivalapimpd
Ok, well for all those people out there who want their maps to have all their textures embedded (to include) into their BSP file instead of making a RES then this is surely the place for you. First off you will need to make sure you know your steam username, if you dont you are retarded :?. Next you need to make a text file with a list of materials that you want to be embedded, the format of the file is like this:
Code: Select all
Directory to be put in
Direct directoryCode: Select all
materials\customtexture\test.vtf
C:\Program Files\Steam\SteamApps\[username]\counter-strike source\cstrike\materials\customtexture\test.vtf
Next save it on your computer to a text file. I'll save mine to C:\include.txt
Next go to Start>Run, in the prompt type 'cmd' without the quotes, click ok. Command prompt will open, now type in the following, remember, it is going to go to the Valve/Steam/SteamApps/[username]/sourcesdk/bin folder so your may vary. By default you should type in to following into command prompt:
Code: Select all
cd "C:\Program Files\Valve\Steam\SteamApps\[username]\sourcesdk\bin"Code: Select all
bspzip.exe -addlist "BSPFILE LOCATION" "THE MATERIAL LIST TXT FILE" "THE NEW BSPFILE LOCATION"Code: Select all
bspzip.exe -addlist "C:\Program Files\Valve\Steam\SteamApps\vivalapimpd\counter-strike source\cstrike\maps\test.bsp" "C:\include.txt" "C:\Program Files\Valve\Steam\SteamApps\vivalapimpd\counter-strike source\cstrike\maps\test.bsp"NOTE: Always put a blank line at the end or you text file!
I am 84% addicted to Counterstrike. What about you?
-
vivalapimpd
- Posts: 62
- Joined: Fri Feb 18, 2005 8:12 pm
Creating Glass
Creating Glass
By Vivalapimpd
First create a brush the size you want the window to be. Next set the texture of the brush to nodraw on every side except for the main face. On the main face texture it with glass_glasswindowbreak070a. If you have more than one face textured with the glass texture the glass will not work.


Next select the brush and tie it to the entity func_breakable_surf. From there you can customize your glass and click apply. Now compile and test.
By Vivalapimpd
First create a brush the size you want the window to be. Next set the texture of the brush to nodraw on every side except for the main face. On the main face texture it with glass_glasswindowbreak070a. If you have more than one face textured with the glass texture the glass will not work.
Next select the brush and tie it to the entity func_breakable_surf. From there you can customize your glass and click apply. Now compile and test.
I am 84% addicted to Counterstrike. What about you?
-
vivalapimpd
- Posts: 62
- Joined: Fri Feb 18, 2005 8:12 pm
Creating a Buy Zone
Creating a Buy Zone
By Vivalapimpd
First create a brush around the area that you want to be a buyzone. Set the texture to the trigger texture.

Then tie the brush to the entity func_buyzone and in the properties select which team it is for. Now just click apply and you are done!

By Vivalapimpd
First create a brush around the area that you want to be a buyzone. Set the texture to the trigger texture.
Then tie the brush to the entity func_buyzone and in the properties select which team it is for. Now just click apply and you are done!
I am 84% addicted to Counterstrike. What about you?
-
vivalapimpd
- Posts: 62
- Joined: Fri Feb 18, 2005 8:12 pm
Creating a Basic Door
Creating a Basic Door
By Madball
1) Load up the Hammer Editor and load up your empty room that you have created. Now using the Block Tool create a wall through the middle of the room so that it splits your single room into two rooms. make the thickness of the wall around 10.
2) Using the Block Tool again this time create a block that is 56 units wide by 112 units high. Make sure that the brush you have created has the same thickness of the wall you want the door to be on.
3) Place and align your new brush in the wall you want the door to be on. Whilst the brush is still selected Right Mouse Click and a list of options will appear. From the list select Carve. This will now carve a hole through the wall so that your door will fit into it perfectly.

4) Using the brush you used to carve the hole, make the thickness about 2 units. Assign a door texture to it.
5) Select the door again and Right Mouse Click and select from the list of options Tie to Entity.
6) A object properties dialog box will appear and in the Class option type func_door_rotating and select apply and close the dialog box.

7) Now using the Selection Tool Drag and move the blue axis ball to the side of the door and save your work. Compile your map and test it. You have now completed the tutorial.

By Madball
1) Load up the Hammer Editor and load up your empty room that you have created. Now using the Block Tool create a wall through the middle of the room so that it splits your single room into two rooms. make the thickness of the wall around 10.
2) Using the Block Tool again this time create a block that is 56 units wide by 112 units high. Make sure that the brush you have created has the same thickness of the wall you want the door to be on.
3) Place and align your new brush in the wall you want the door to be on. Whilst the brush is still selected Right Mouse Click and a list of options will appear. From the list select Carve. This will now carve a hole through the wall so that your door will fit into it perfectly.
4) Using the brush you used to carve the hole, make the thickness about 2 units. Assign a door texture to it.
5) Select the door again and Right Mouse Click and select from the list of options Tie to Entity.
6) A object properties dialog box will appear and in the Class option type func_door_rotating and select apply and close the dialog box.
7) Now using the Selection Tool Drag and move the blue axis ball to the side of the door and save your work. Compile your map and test it. You have now completed the tutorial.
I am 84% addicted to Counterstrike. What about you?
-
vivalapimpd
- Posts: 62
- Joined: Fri Feb 18, 2005 8:12 pm
Creating Bombtargets
Creating Bombtargets
By RomeoJGuy
Create a brush using it the size you want the bomb target area to be and use the trigger brush to texture it. Make sure all areas touch the ground so the bomb can be planted throughout the target. Right click the brush and select "Tie to Entity". In the entity drop-down box select func_bomb_target. Now go ahead and compile and test your map.
I am 84% addicted to Counterstrike. What about you?
-
Dude.
- Posts: 678
- Joined: Thu Jul 08, 2004 1:13 pm
Displacement Mapping Tool
By DudeGPQ
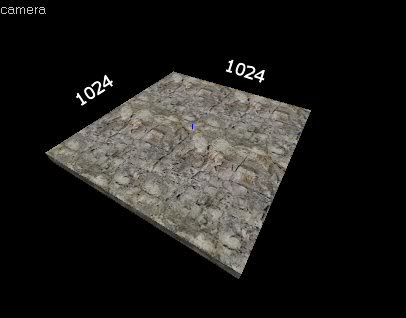
Start a new map file, click the block tool, select the "blendcliffgrass001a" texture, make a 1024x1024 square for the ground:
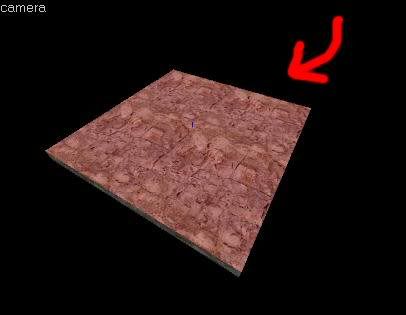
Click the texture application tool and click the top of the texture, like so:
Afterwards, go to the face edit sheet, and click the Displacement tab:
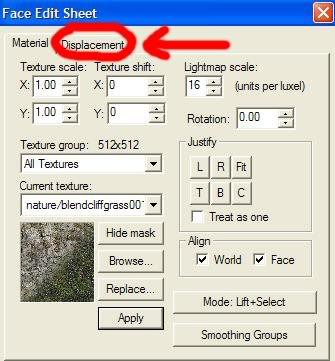 ]
]
Click "create", and set it to about 3, then press OK, you should see a bunch of little triangles on top of the brush now, and that the other faces are missing, click the "Invert Alpha" tab, and it should turn to grass, then click the "Paint Geometry" tab, make sure "Raise/Lower: is selected and that Axis is "Face Normal" when you go into the 3D View, you'll notice a little green sphere, that will be raising and lowering, move it around the triangles and notice it goes at the certain points. Left mouse click will raise the ground, and right mouse click will lower it. Mess around with it until you get something like this:
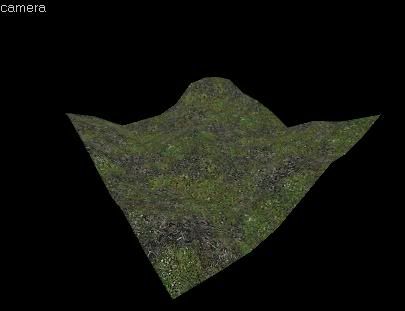
Click the "Paint Alpha" tab, and have "Raise to" selected, also set the value to about 25.00, and then click on those hills, and you should get something like this:
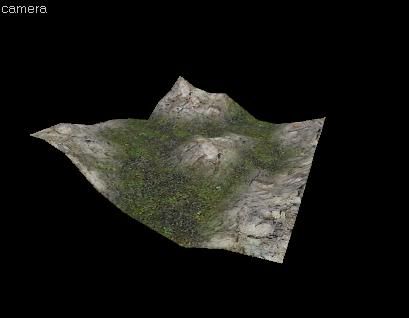
The highest power you could have it set to is 4, and the lowest is 2, 4 is really smooth, but increases compile time.
Note: You could use any texture that begins with "blend" and it will have the same effect.
By DudeGPQ
Start a new map file, click the block tool, select the "blendcliffgrass001a" texture, make a 1024x1024 square for the ground:
Click the texture application tool
and click the top of the texture, like so:Afterwards, go to the face edit sheet, and click the Displacement tab:
]Click "create", and set it to about 3, then press OK, you should see a bunch of little triangles on top of the brush now, and that the other faces are missing, click the "Invert Alpha" tab, and it should turn to grass, then click the "Paint Geometry" tab, make sure "Raise/Lower: is selected and that Axis is "Face Normal" when you go into the 3D View, you'll notice a little green sphere, that will be raising and lowering, move it around the triangles and notice it goes at the certain points. Left mouse click will raise the ground, and right mouse click will lower it. Mess around with it until you get something like this:
Click the "Paint Alpha" tab, and have "Raise to" selected, also set the value to about 25.00, and then click on those hills, and you should get something like this:
The highest power you could have it set to is 4, and the lowest is 2, 4 is really smooth, but increases compile time.
Note: You could use any texture that begins with "blend" and it will have the same effect.
-
vivalapimpd
- Posts: 62
- Joined: Fri Feb 18, 2005 8:12 pm
Rotating Fans
Rotating Fans
By Zpanzer
In this tutorial I will show how to make an rotating fan in some easy steps. Its pretty simply using 1 entity and one brush based entity.
1. first of all build your room or whatever you want the fan in.
2. After that make an prop_dynamic and give it the model of your fan(props/de_prodigy/fan.mdl), get the propeties and edit:
Name: fan01
Parent: rot01 (we make this shortly)
Save the propeties.
3. Then make an brush with the texture of toolsorigin (edit if you can use others) in the middle of the models and then press tie to entity and make it an func_rotating and edit:
Name: rot01
And then your done, compile the map and you will se an rotating fan where you placed it.
I am 84% addicted to Counterstrike. What about you?
-
NIPPER

- Posts: 10684
- Joined: Tue Mar 19, 2002 9:49 pm
- Contact:
Here are some links
Tutorials and references:
http://www.chatbear.com/board.plm?a=boa ... &v=flatold
http://www.valve-erc.com/srcsdk/Hammer/
http://www.hl2world.com/wiki/index.php/Main_Page
Texture reference sites:
http://lemog.club.fr/index.html
http://www.imageafter.com/
(un-sticky the old thread)
Tutorials and references:
http://www.chatbear.com/board.plm?a=boa ... &v=flatold
http://www.valve-erc.com/srcsdk/Hammer/
http://www.hl2world.com/wiki/index.php/Main_Page
Texture reference sites:
http://lemog.club.fr/index.html
http://www.imageafter.com/
(un-sticky the old thread)
-
HomicidalApe

- Posts: 5872
- Joined: Tue Oct 14, 2003 9:56 pm
- Location: distant shores
- Contact:
Making PLACE NAMES for .navs
What am I talking about?
I'm talking about the names you see under your radar in official maps, and next to your messages, radio commands, and voice display.
http://www.homicidalape.mybigspoon.com/ ... atitis.jpg
The downside to this system
You cannot make your own names for places, there is a set list, which sucks. But most of the generic names like kitchen, bathroom, frontyard, porch etc are usable.
How to do it?
for an example, i'm going to add place names to de_alleyrush
1. Load up your custom map that you want to add place names to and, if you haven't already, let cs:s make an auto .nav for the map by typing in console "nav_generate."
http://www.homicidalape.mybigspoon.com/ ... navgen.jpg
2. Now you need to enter nav edit mode. Enter "sv_cheats 1" in console, then "nav_edit 1". It should look like this: http://www.homicidalape.mybigspoon.com/ ... avedit.jpg
3. Now enter nav_toggle_place_mode into the console. This must be turned on to make placenames or see placenames layed out.
4. Choose a name you want to use for your place. I'm going to use the name CTspawn for the ct spawn area in the alleyrush map: http://www.homicidalape.mybigspoon.com/ ... eplace.jpg
type "nav_use_place" to see the list
and type "nav_use_place nameofplace" to use a certain name.
5. Now to start applying your selected name to the "nav mesh", you must type nav_toggle_place_painting in console. Now when your crosshair rolls over a mesh spot it applies the name to the surface. So start rolling the crosshair in the spots you want and they should turn green like this: http://www.homicidalape.mybigspoon.com/ ... epaint.jpg
6. At any time, you can change the name again with nav_use_name blah and keep rolling over surfaces: http://www.homicidalape.mybigspoon.com/ ... itgoin.jpg
http://www.homicidalape.mybigspoon.com/ ... going2.jpg
7. Turn off nav_toggle_place_mode and then type nav_save in console, this may take a few seconds while it saves everything to the .nav.
That should be it.")
What am I talking about?
I'm talking about the names you see under your radar in official maps, and next to your messages, radio commands, and voice display.
http://www.homicidalape.mybigspoon.com/ ... atitis.jpg
The downside to this system
You cannot make your own names for places, there is a set list, which sucks. But most of the generic names like kitchen, bathroom, frontyard, porch etc are usable.
How to do it?
for an example, i'm going to add place names to de_alleyrush
1. Load up your custom map that you want to add place names to and, if you haven't already, let cs:s make an auto .nav for the map by typing in console "nav_generate."
http://www.homicidalape.mybigspoon.com/ ... navgen.jpg
2. Now you need to enter nav edit mode. Enter "sv_cheats 1" in console, then "nav_edit 1". It should look like this: http://www.homicidalape.mybigspoon.com/ ... avedit.jpg
3. Now enter nav_toggle_place_mode into the console. This must be turned on to make placenames or see placenames layed out.
4. Choose a name you want to use for your place. I'm going to use the name CTspawn for the ct spawn area in the alleyrush map: http://www.homicidalape.mybigspoon.com/ ... eplace.jpg
type "nav_use_place" to see the list
and type "nav_use_place nameofplace" to use a certain name.
5. Now to start applying your selected name to the "nav mesh", you must type nav_toggle_place_painting in console. Now when your crosshair rolls over a mesh spot it applies the name to the surface. So start rolling the crosshair in the spots you want and they should turn green like this: http://www.homicidalape.mybigspoon.com/ ... epaint.jpg
6. At any time, you can change the name again with nav_use_name blah and keep rolling over surfaces: http://www.homicidalape.mybigspoon.com/ ... itgoin.jpg
http://www.homicidalape.mybigspoon.com/ ... going2.jpg
7. Turn off nav_toggle_place_mode and then type nav_save in console, this may take a few seconds while it saves everything to the .nav.
That should be it.
"it's basically valve's fault." - Joe
"I have a very predictable pattern here: I make smarmy comments and call people on bullshit. If you start an asinine argument with me, I will not back down." - Hellboy
"the reign of hellboy has seen unprecedented prosperity! viva la hellboy! - Joe
"I have a very predictable pattern here: I make smarmy comments and call people on bullshit. If you start an asinine argument with me, I will not back down." - Hellboy
"the reign of hellboy has seen unprecedented prosperity! viva la hellboy! - Joe
-
sebastian
Making CODELOCKS!
Want to protect a area in your map so only you can access it?
Want a clan room with weapons where only your clan members should have access?
Do this:
Create a logic_compare called codecheck
Create a math_counter called precode
Create a math_counter called codeentry
create a math_counter called codememory
create three logic_case called compare1, compare2 and compare3.
create ten buttons.
create an event to precode called "setvalue" with the desired code digit for each buttons "OnPressed".
For example the button that should generate an five:
but5.OnPressed --> precode.setvalue(5);
Do this for all nine buttons.
For the last 10'th button, that should be a reset button, do this:
reset.OnPressed --> precode.setvaluenofire(0)
reset.OnPressed --> codememory.setvaluenofire(0)
reset.OnPressed --> codeentry.setvaluenofire(1000)
Add this events:
precode.outvalue --> Codeentry.multiply
codeentry.outvalue --> codememory.Add
codeentry.outvalue --> compare1.invalue
codeentry.outvalue --> compare2.invalue
codeentry.outvalue --> compare3.invalue
codememory.outvalue --> codecheck.setvalue
add following cases to the three logic_case
compare1.case 01: 1000
compare1.case 02: 2000
compare1.case 03: 3000
compare1.case 04: 4000
compare1.case 05: 5000
compare1.case 06: 6000
compare1.case 07: 7000
compare1.case 08: 8000
compare1.case 09: 9000
compare1.case 10: 100
compare1.case 11: 200
compare1.case 12: 300
compare1.case 13: 400
compare1.case 14: 500
compare1.case 15: 600
compare1.case 16: 700
compare2.case 01: 800
compare2.case 02: 900
compare2.case 03: 10
compare2.case 04: 20
compare2.case 05: 30
compare2.case 06: 40
compare2.case 07: 50
compare2.case 08: 60
compare2.case 09: 70
compare2.case 10: 80
compare2.case 11: 90
compare2.case 12: 1
compare2.case 13: 2
compare2.case 14: 3
compare2.case 15: 4
compare2.case 16: 5
compare3.case 01: 6
compare3.case 02: 7
compare3.case 03: 8
compare3.case 04: 9
Add following events to compare1:
-----------------------------------------------
compare1.oncase01
to
compare1.oncase09
--> codeentry.setvaluenofire(100)
-----------------------------------------------
compare1.oncase10
to
compare2.oncase02
--> codeentry.setvaluenofire(10)
-----------------------------------------------
compare2.oncase03
to
compare2.oncase11
--> codeentry.setvaluenofire(1)
-----------------------------------------------
compare2.oncase12
to
compare3.oncase04
--> codecheck.compare()
------------------------------------------------
Set the compare value of the codecheck logic_compare to your desired 4 digit access code.
Then add the following three events to both OnEqual and OnNotEqual of codecheck:
precode.setvaluenofire(0)
codememory.setvaluenofire(0)
codeentry.setvaluenofire(1000)
Then you can place a codecheck.onequal pointing to a door/button to unlock, and codecheck.onnotequal to an access denied message, red light or something.